Hello Everyone!!
How are you all doing?
I hope you are having a wonderful day.
It's a bit gloomy from where I am right now.
I think it's gonna rain soon.
Anyways,
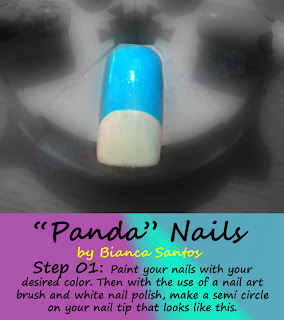
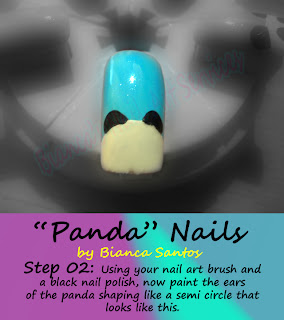
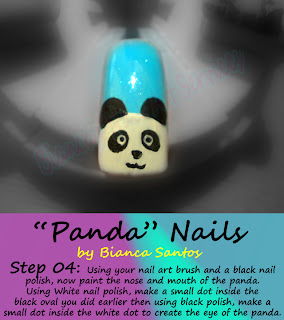
Yesterday, we have made the cutest "Panda" Nails you can ever imagine!
Now, we are going to do:
Photo Nail Art Tutorial for "CAT" Nails!
Yesterday, I was thinking about what to do for my next Photo Nail Art Tutorial.
Then, I thought about animals since I started with Panda, but then animals
like Zebra, Tiger, Leopard, Giraffe, Pig, Bird, Butterfly, etc..
is so common already for nail arts and I wanna do something DIFFERENT.
So, when I saw a cat from one of my friend's in Facebook's post photos,
I decided to do "CAT NAILS"!
So, here we Goooooooooooo..........
 STEP #01: You can either: Draw OR do a Sponge Nail Art for your Base Color, this would be your Cat's fur color. You can apply any color you desire for your cat. ^_^
Materials Used:
- Sponge (better to use the same quality of sponge you use for washing up dishes).
- Klean Color Nail Lacquer's Metallic Mango,Cafe Au Lait, and Metallic Yellow.
STEP #02: Using your Detail Nail Art Brush and Color Black Nail Polish or Acrylic Paint, draw various size, thickness, and angles of small vertical lines for the Cat's Fur lining that looks like the photo shown.
Materials Used:
- Edinburgh Realism Grace #10 for my Detail Brush.
- Mars Black from Pebeo Acrylic Colour for Cat's Fur lining.

STEP #03: Using your Detail Nail Art Brush and Color White Nail Polish or Acrylic Paint, draw a semi circle at the tip of your fingernail, this will create the color of the fur around the cat's mouth. Then, draw two small oval shape, this creates the color of the fur around the Cat's eyes. And, two inverted letter "V" for the cat's ears.
Materials Used:
- Edinburgh Realism Grace #10 for my Detail Brush.
- Titanium White from Pebeo Acrylic Colour for Cat's fur around the mouth, eyes, and ear.

STEP #04: Using your Detail Nail Art Brush and Color Black Nail Polish or Acrylic Paint, draw a small inverted triangle for the cat's nose, then make two curve lines for the cat's mouth, and two inverted curve lines for the cat's eye.
Materials Used:
- Edinburgh Realism Grace #10 for my Detail Brush.
- Mars Black from Pebeo Acrylic Colour for Cat's Fur lining.
STEP #05: Using your Detail Nail Art Brush and Color Black Nail Polish or Acrylic Paint, draw the outline for the cat's ear. Using your Detail Nail Art Brush and Color White Nail Polish or Acrylic Paint,

draw the whiskers of the cat. Add some detail and apply Top Coat (colorless nail polish) and you're good to go!!
Materials Used:
- Edinburgh Realism Grace #10 for my Detail Brush.
- Mars Black from Pebeo Acrylic Colour for Cat's ear outline.
- Titanium White from Pebeo Acrylic Colour for Cat's whiskers.
- Sally Hansen No Chip Acrylic Top Coat.
AND..........
We are DONE!!!!!
I hope you enjoyed this furious but very sweet Cat we did today.
^_^
Tomorrow, I will do Tenderheart Bear from Care Bears,
a request from one of my friends.
Watch it out!!
Share me your work of art!
Email me at
Let's all share our work of art on our nails and be inspired!
Don't forget to put some comment and let me know your requested Nail Art Designs
so I can help you show how to do these designs in 5 simple steps!
Happy polishing Everyone!
"Beautiful Nails For Beautiful Women"
- Bianca Santos
Add me up in Facebook:
LIKE my Facebook Page:
Get Your FREE Complimentary Reports that Reveals
the 15 Mistakes You're Making with Regard
to Running a Perfect Salon:
Thank You soooooo much!!!!
(^_^)


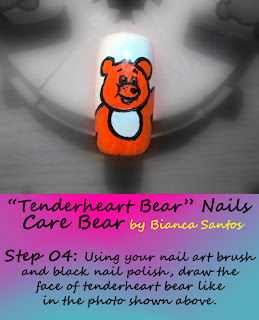 Bear. Start by drawing a small oval shape in the middle of the face, then draw an inverted letter "C" connecting to the left side of the oval. Then, draw two inverted small curve and a dot for the eyes. Then, draw two lines for the eyebrow. Next, draw a small heart inside the oval for the nose and lastly, a small curve line below the oval for the mouth. Your drawing should look like the photo shown.